
ANKMAX M2U32C Dual M.2 SSD Enclosure Quick Guide
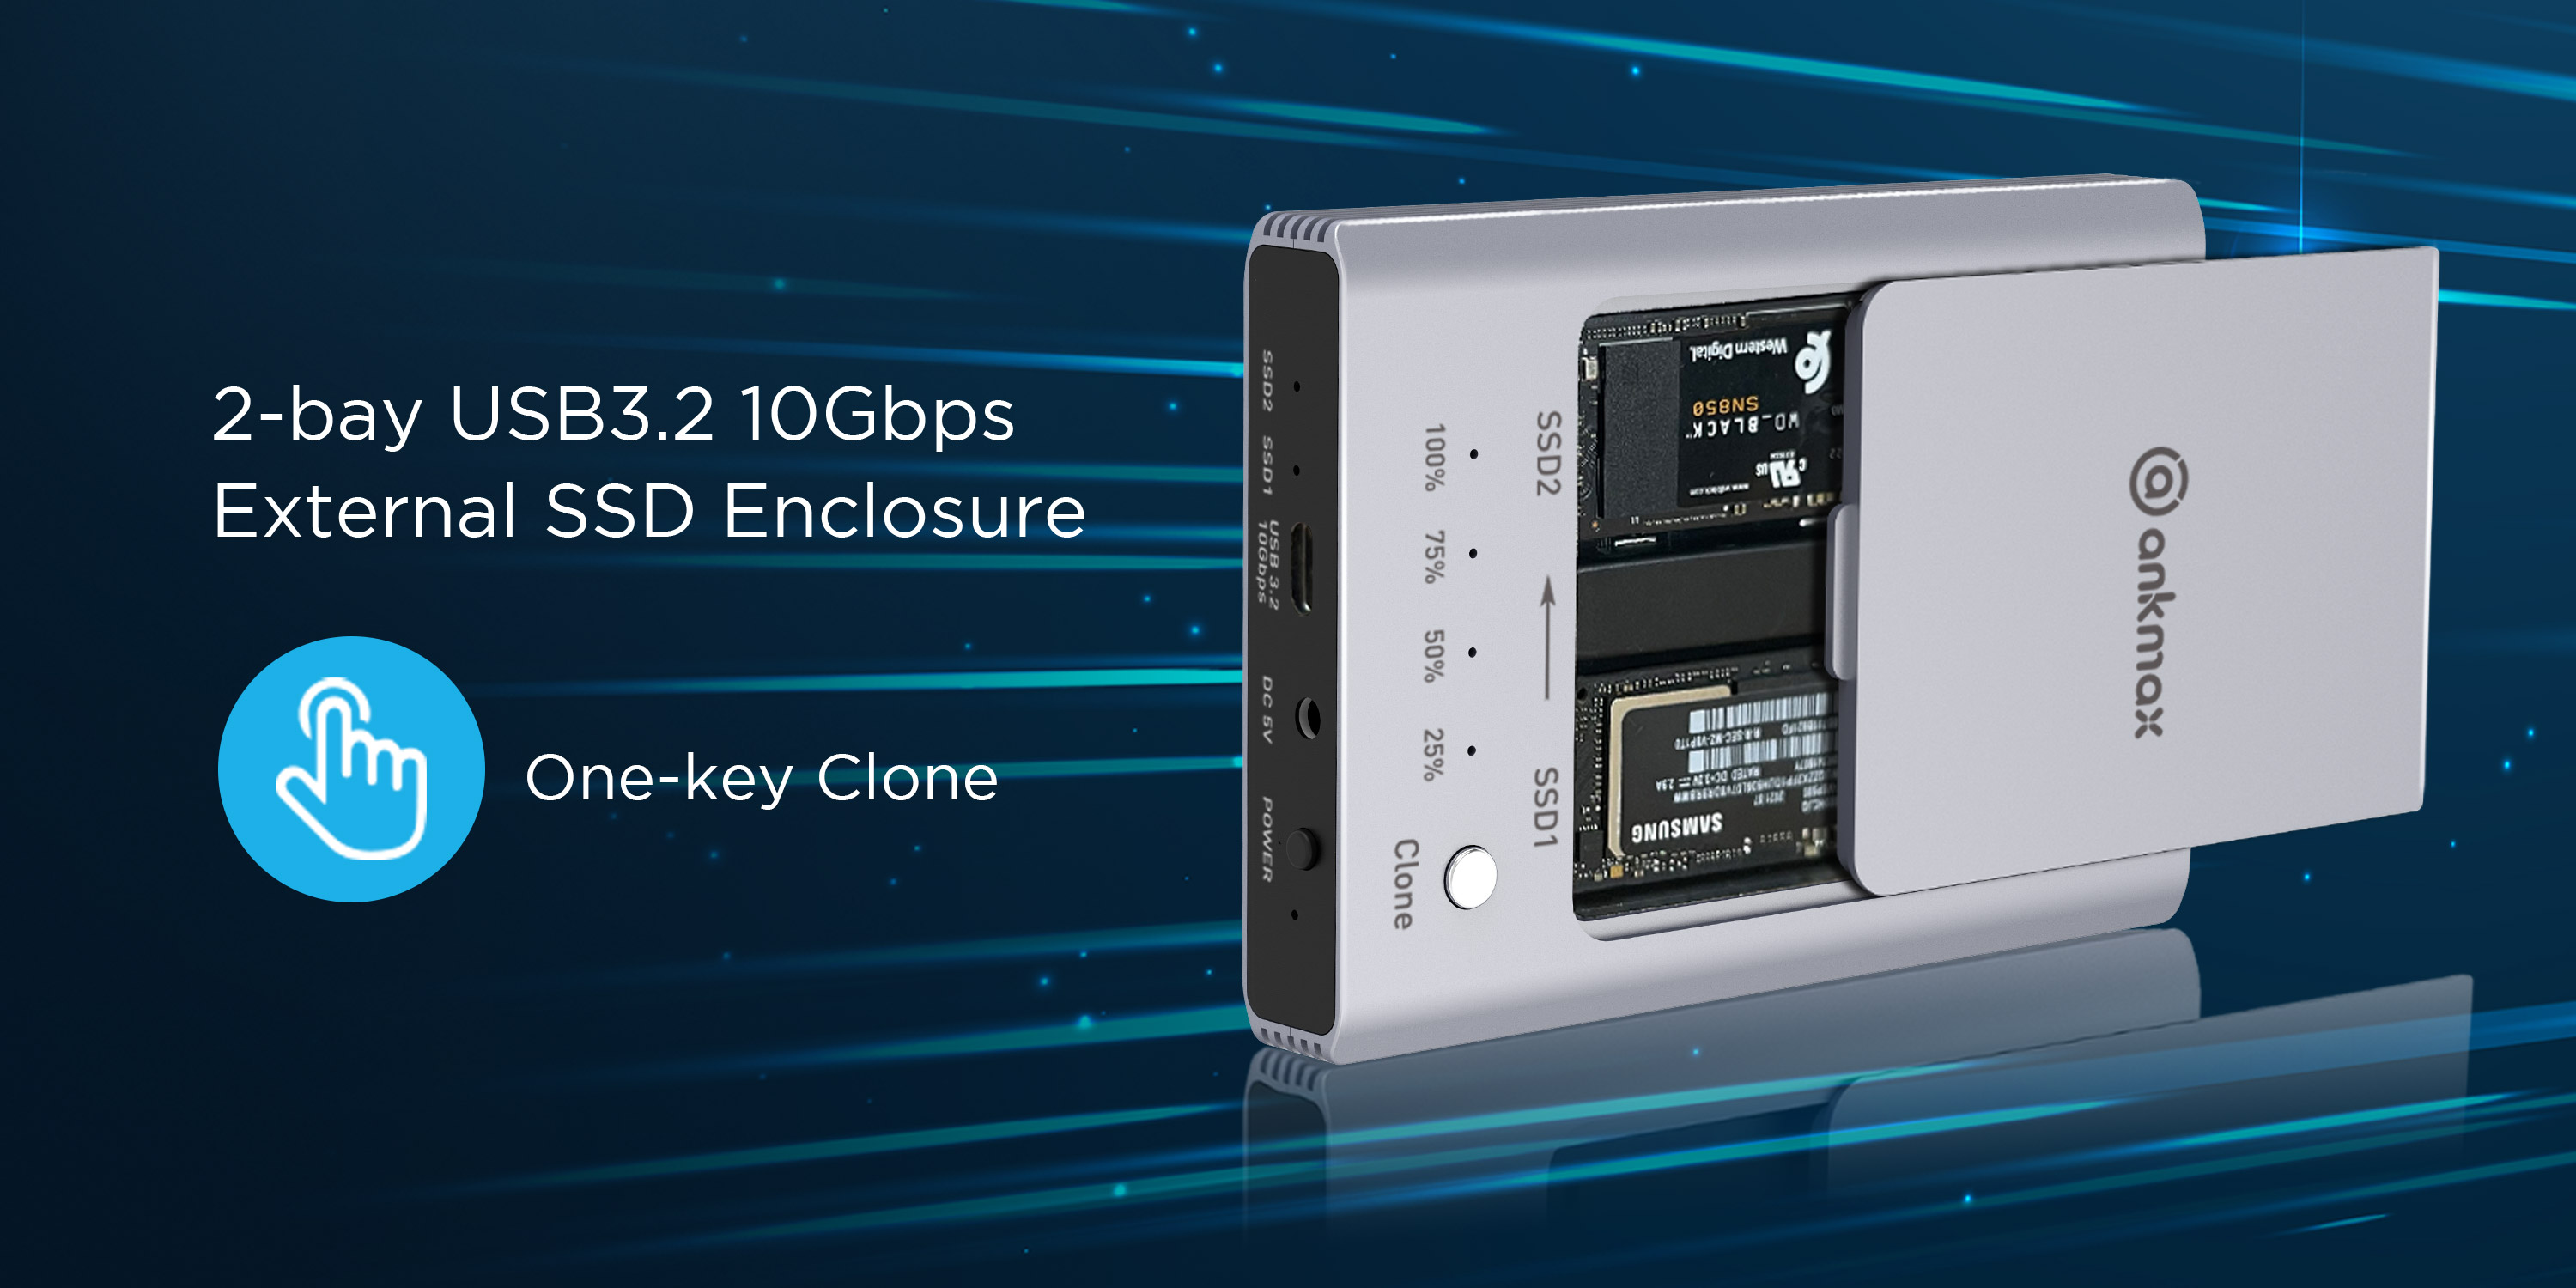
Table of Contents
Product Interface Description
Package Contents
SSD Installation Guide
Cloning Operation
Connecting to a Computer
Frequently Asked Questions
Product Interface Description

Package Contents
NVMe M.2 SSD Dual Enclosure
USB C to C cable x1
USB C to A cable x1
Power adapter x1
Fixed Fastener x2
Thermal Tape x2
Quick Guide x1

SSD Installation Guide
Step 1: Remove the bottom plate by pulling it up from its recess.

Step 2: At a 45-degree angle, slide the SSD into the M.2 socket until it is properly seated. Then place the rubber fastener on the disk’s notch. The rubber fastener has a slit that will fit the disk’s U-shaped notch.

Step 3: Lower the SSD and carefully push down on the rubber fastener until it goes through the pre-perforated hole in the PCB.

Step 4: Make sure to remove thermal tape protector from the thermal tape.

Step 5: Stick the thermal tape on the bottom cover. ( If it is not a long time big data transfer, no need stick the thermal tape.)

Step 6: At a 45-degree angle, insert and put down the bottom cover, Make sure “clicks” in the bottom.

Offline Cloning Function
1. Insert your Source drive into SSD1 and the target drive into SSD2.
2. Plug one end of the included power adapter into the DC-IN port and the other into a power outlet.
3. Press the power button. The LED will turn blue.
IMPORTANT NOTES
• All data in SSD2 will be deleted once offline clone starts.
• We highly recommend backing up all your data first before you clone your SSDs.
PREREQUISITES
- 1. The source drive is SSD1,the target drive is SSD2.
- 2. The source drive has to be of equal or smaller size than the target drive. In other words, if the target drive is smaller than the source drive, the cloning function will not work.
- 3. For instance, if your source drive SSD1 (the one you want to clone) has 500 GB, your target drive SSD2 should at least have 500GB.
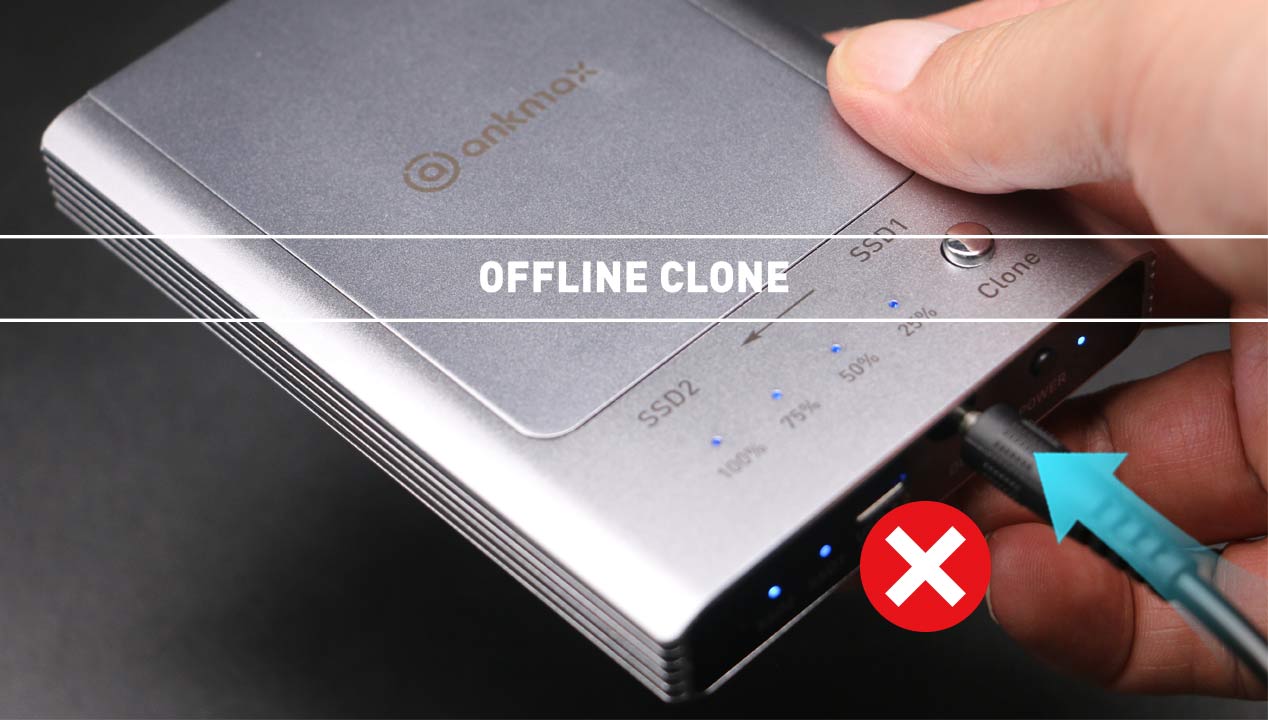
- 4. Before cloning, disconnect the USB cable from your external enclosure.
Offline Cloning Procedure
1. Once more, confirm the USB cable is NOT connected to the USB enclosure.
2. Your source disk will be in SLOT SSD1, and your target disk will be in SLOT SSD2.

3. After installing both disks, connect your AC adaptor to the power outlet and to the enclosure. 
4. Turn on the enclosure with the power button.

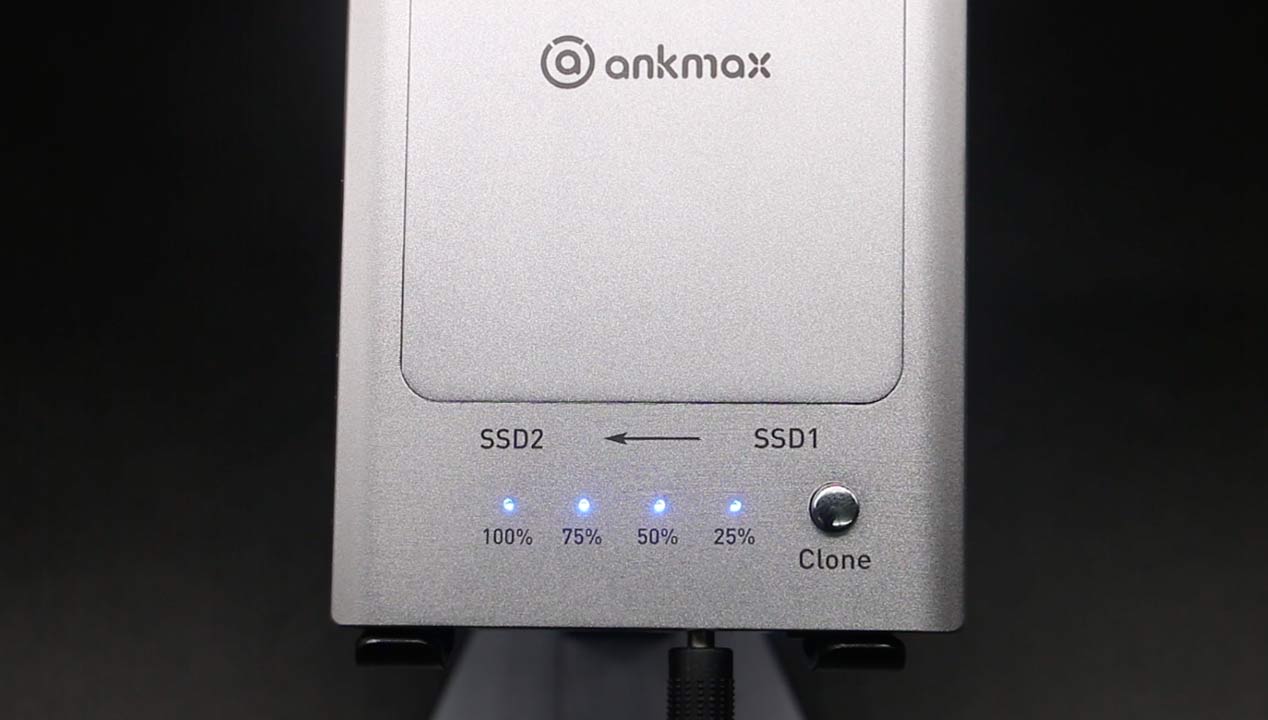
5. Hold down the offline clone button on the top of the device for 5 seconds, and all the cloning progress indicator lights will light up. Release the clone button at this time, and the four LED progress indicator lights will start flashing in a loop. The SSD1 and SSD2 indicator lights will start flashing at the same time, indicating that the cloning process has started.
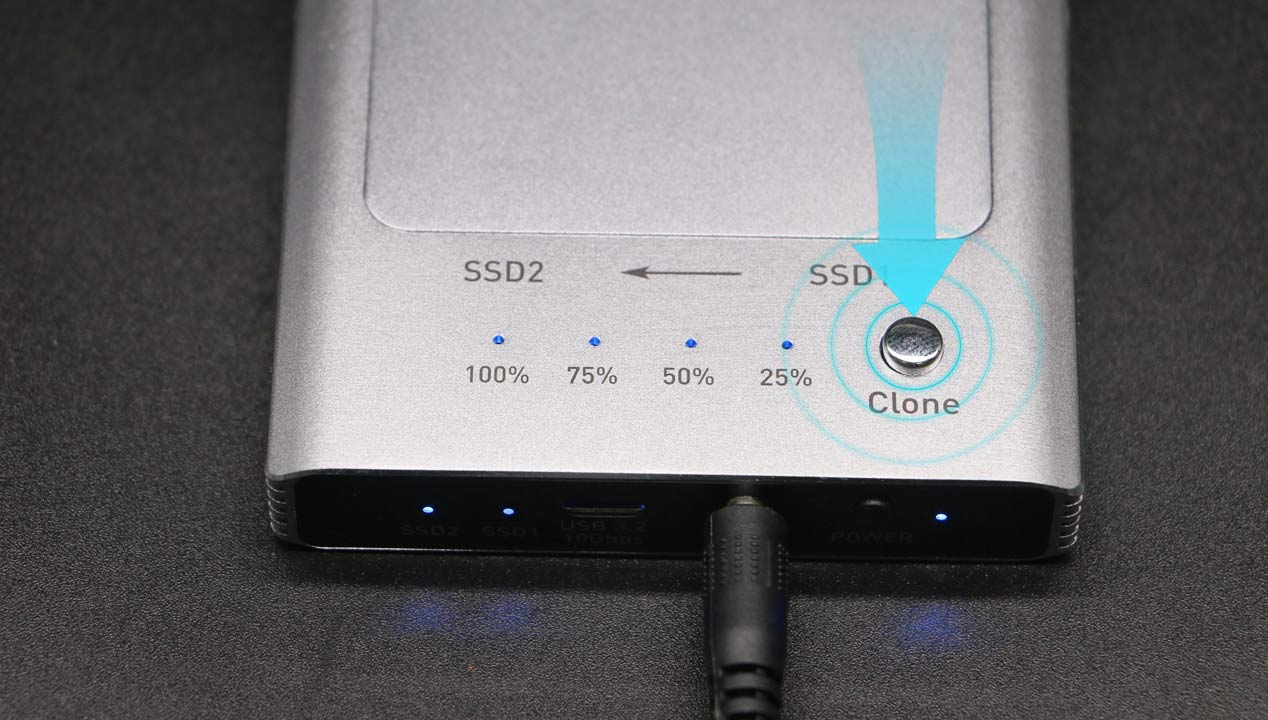
6. When the cloning is 25% complete, the 25% indicator light will stop flashing and remain on, while the other three LED progress indicator lights will continue to flash in a loop until 100% completion.

7. The LED shows the clone process (25%-50%-75%-100%). Once the LEDs stop flashing and all four of them remain solid at 100%, the cloning process is finished. Beware, this process may take a long time, even with extremely fast NVMe disks. It will mainly depend on the size of the disks, and more specifically on the amount and size of small files.
8. You can then reattach the USB cable to both the enclosure and the computer.
WARNING: Never install any disks while the device is powered on or connected to the computer’s USB port.
STATEMENT
Please develop the habit of backing up in time for the important information inside SSD, Any electronic product may be at risk of damage during operation. If you run into any product issues, we are only responsible for the processing of the return of the product itself. We are not processing responsible for recovering the data in the SSD, Nor is it liable for lossescaused by lost data.
How to connect the computer
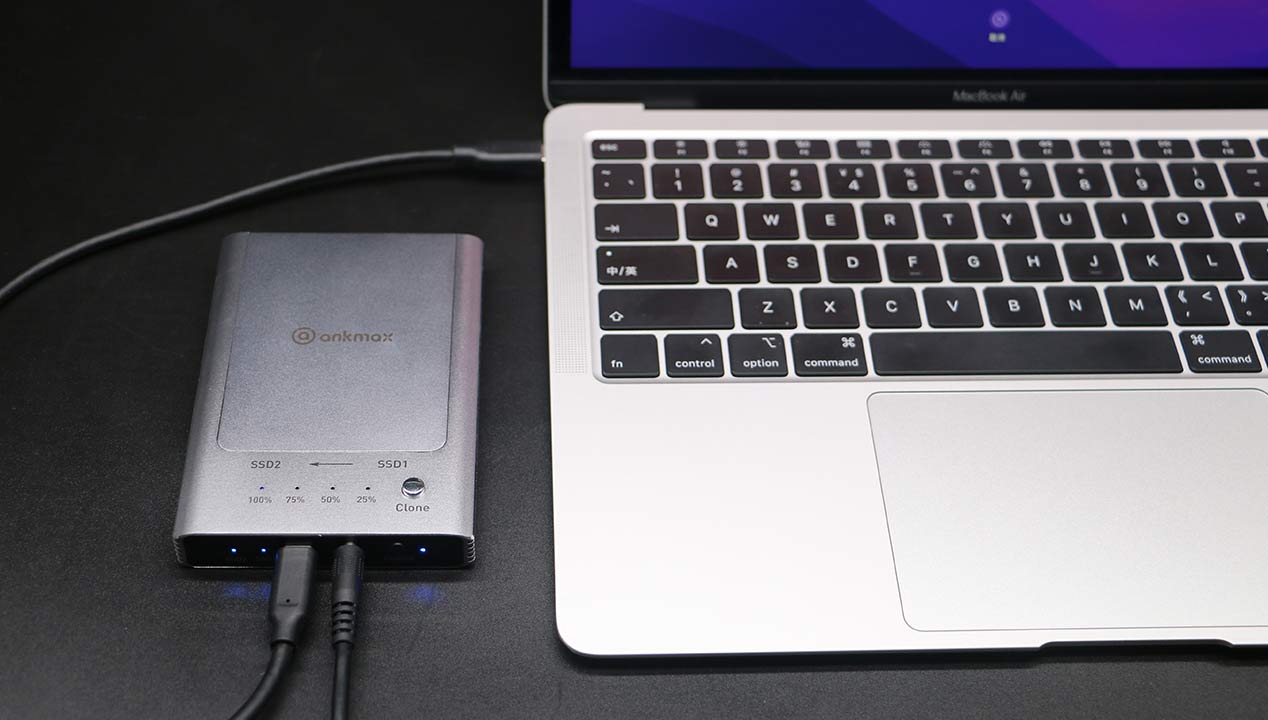
After cloning is completed, you can connect the device to the computer using the USB cable provided.
• Plug one end of the included power adapter into the DC-IN port and the other into a power outlet.
• Connect the USB cable to both the device and the computer.

• Press the power button. The LED will turn blue.
Windows System
Since cloning makes all the data on SSD2 identical to SSD1, including the drive letters, Windows PC will only display SSD1, and SSD2 will not be directly visible in "This PC." To display the drive letter for SSD2, follow these steps:
Right-click on "This PC," select "Manage,"

click on "Disk Management,"

select the offline status of SSD2, right-click, and choose "Online."

Performance of SSD1 and SSD2 on Windows System
SSD1 Read/Write Speed: Read 821MB/s, Write 776MB/s.
SSD2 Read/Write Speed: Read 1053MB/s, Write 966MB/s.
As you can see, there is a slight difference in the read/write speeds between SSD1 and SSD2. The performance is slightly better for the same SSD in the SSD2 interface position. This is a normal phenomenon and is independent of the SSD brand and model. You can use it with confidence.
Testing Environment: Windows 11, Samsung 990 Pro 1TB, WD SN850 1TB.

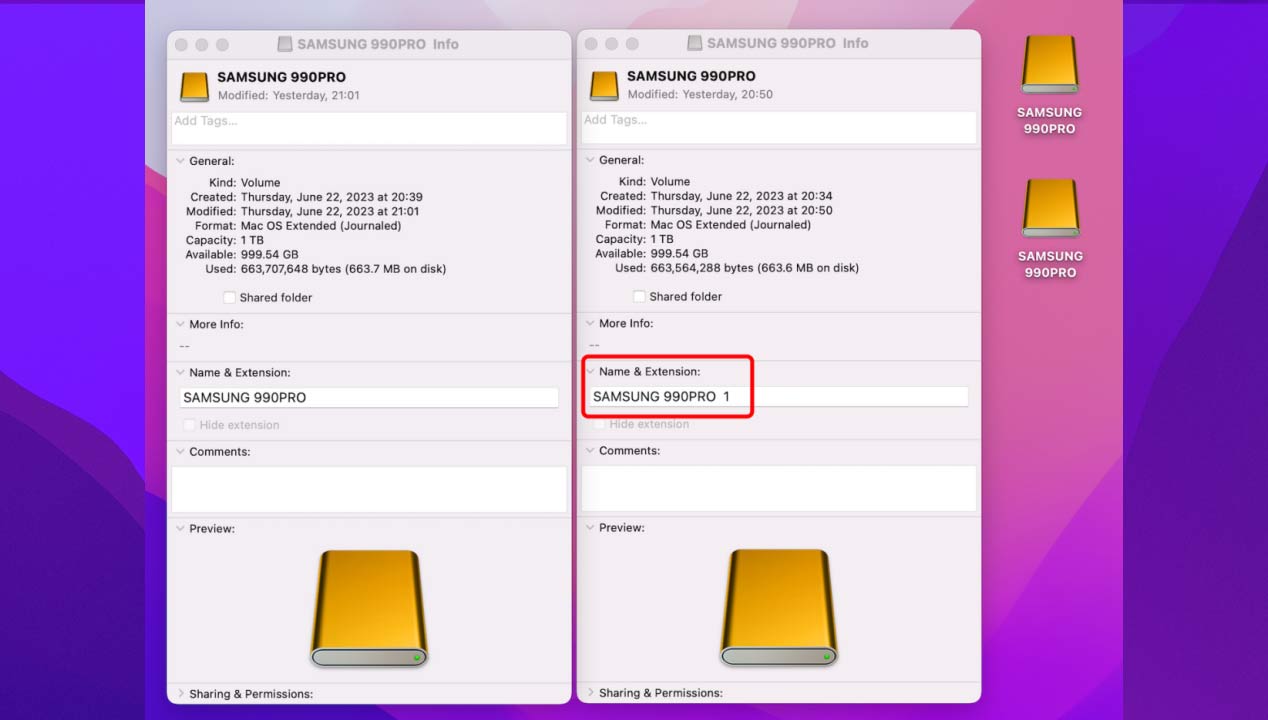
Mac OS
When connecting and using on a Mac device, you will see two SSD devices with the same name on the desktop, making it difficult to distinguish between them. To identify SSD2, click on the device, and in the displayed summary and extension names, you will notice that the cloned SSD has an added "1" as an extension. This indicates that SSD2 is the target SSD in the cloned position. You can rename SSD2 for easy identification and usage.
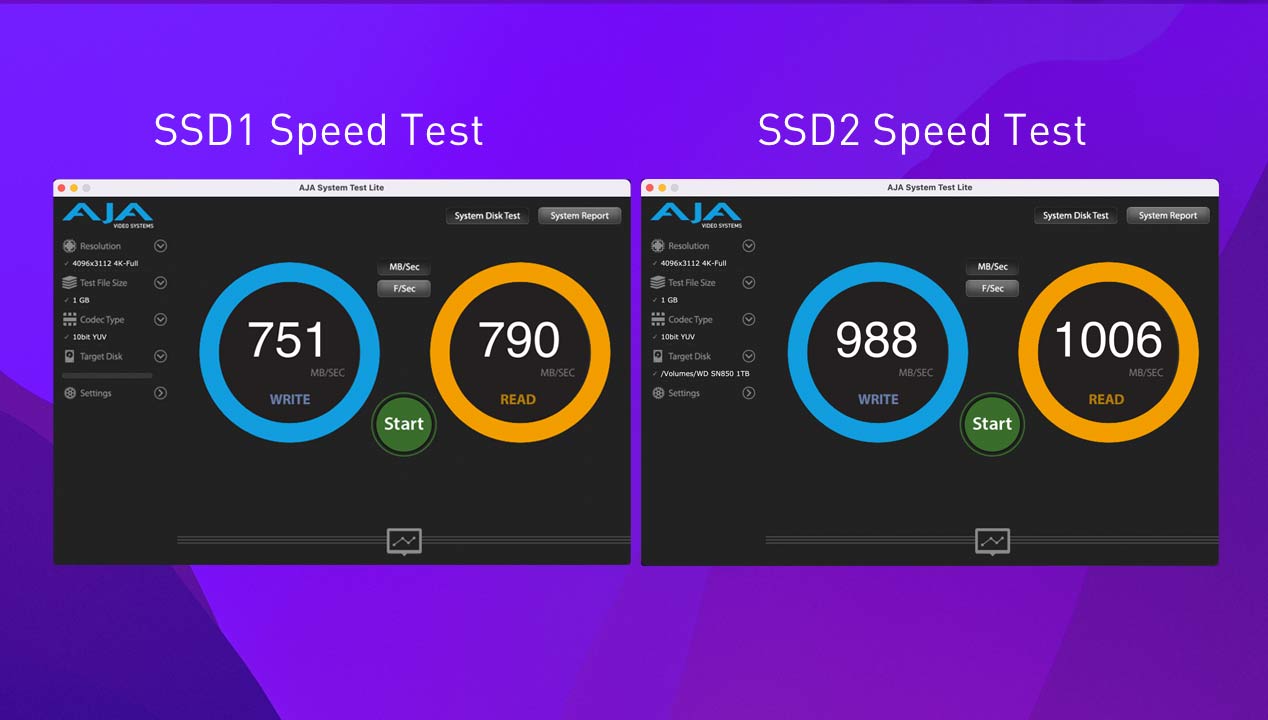
Performance of SSD1 and SSD2 on macOS:
SSD1 Read/Write Speed: Read 751MB/s, Write 790MB/s.
SSD2 Read/Write Speed: Read 1006MB/s, Write 988MB/s.
As you can see, there is also some difference in the read/write speeds between SSD1 and SSD2 on macOS. The performance is slightly better for the same SSD in the SSD2 interface position. This is a normal phenomenon and is independent of the SSD brand and model. You can use it with confidence.
Testing Environment: macOS Ventura 13.4, Samsung 990 Pro 1TB, WD SN850 1TB.

FAQ
Q: How do I operate the cloning function? How can I confirm that the cloning is completed?
A: You can follow the steps below for proper cloning operation, and step 5 can confirm the completion of cloning:
The cloning function copies all the content from SSD1 to SSD2, which will completely erase the content on SSD2. Therefore, please make sure to backup the data on SSD2 before starting the cloning process to avoid data loss.
The capacity of SSD2 must be equal to or larger than SSD1; otherwise, cloning cannot be performed.
When using the cloning function, ensure that the device is not connected to the computer.
Once SSD1 and SSD2 are installed and the SSD indicator lights are functioning properly, press and hold the cloning button on the device for more than 5 seconds. When all the cloning progress indicator lights are lit, release the cloning button. The four LED progress indicator lights will start flashing, and the SSD1 and SSD2 indicator lights will also start flashing, indicating that the cloning process has started.
When the cloning reaches 25%, the 25% indicator light will stop flashing and remain lit, while the other three LED progress indicator lights will continue to cycle. This process repeats for 50%, 75%, and finally 100% completion, where all four LED progress indicator lights remain lit. This indicates that the cloning process is completed.
Q: The cloning button was pressed, but only the 25% light is on and the progress indicator lights are not flashing.
A: This may happen if the capacity of the target SSD2 is smaller than the source SSD1. In this case, you need to replace SSD2 with a target SSD that has an equal or larger capacity than SSD1.
Q: The cloning button was pressed, but none of the four progress indicator lights are lit.
A: This may be because the USB cable is still connected to the computer. Please disconnect the USB cable from the computer.
Q: The ANKMAX device is recognized as connected, but the drive letter is missing in the File Explorer.
A: Open Disk Management with administrator privileges. In the search box on the taskbar, type "Disk Management," select and hold (or right-click) on "Disk Management," and then select "Run as administrator" > "Yes." If you are unable to open it as an administrator, type "Computer Management" and go to "Storage" > "Disk Management." In Disk Management, right-click on the offline SSD2 hard disk and select "Online."
Q: After cloning, the target drive is not showing up.
A: Cloning makes SSD2 identical to SSD1, including the drive letters. Therefore, when the cloned device is connected to a Windows system, only SSD1 will be displayed in This PC, and SSD2 will not be shown. To resolve this, right-click on This PC, select Manage, click on Disk Management, select the offline SSD2 disk, right-click, and choose Online to display the drive letter for SSD2.
Q: After cloning, the capacity of the target SSD2 appears to be smaller.
A: After the cloning process, if the target drive is larger than the source drive, the remaining space will be kept as unallocated space. This means the operating system will show the new cloned drive (target) with the same partitions and storage capacity as the original source drive. To utilize the unallocated space and add it to the last partition of the new cloned drive, right-click on the last unallocated space of the new cloned drive, and perform formatting and partitioning operations.
Q: The connected device is not recognizing the SSD enclosure.
A: Please refer to the following options for troubleshooting:
For a new SSD being used for the first time, it needs to be initialized in Disk Management to be detected and used properly.
The SSD needs to be fully inserted for it to work correctly. Ensure that your SSD is fully inserted into the M.2 interface slot by pushing it in at a 45-degree angle.
This device only supports NVMe M.2 SSD types. Make sure the inserted SSD is an NVMe M.2 SSD, not other types like SATA.
If the USB device is still not recognized in Windows or MacOS, please refer to the official website's FAQ section for troubleshooting or contact the official support email (support@ankmax.com).
NEED HELP?
Please visit to www.ankmax.com/support/
or contact our Support Team (support@ankmax.com)